McFeelys Pocket Hole Joinery
| Pockethole Screw Size Selection | ||
| Material Thickness | Kreg® Recommended Screw Length | Use Screw Length |
|---|---|---|
| 1/2 in., 5/8 in. | 3/4 in., 1 in. For 1/2 in. Thick Material: Kreg recommends Pan or Fillister Head screws with the Optional Micro-Pocket™ Drill Guide and 1 in. when using the standard Kreg Jig® Drill Guide.  |
1 in. |
| 3/4 in. | 1-1/4 in. |
1-1/4 in. |
| 7/8 in. to 1-3/8 in. | 1-1/2 in. |
1-1/2 in. |
| 1-1/2 in. | 2-1/2 in. |
2-1/2 in. in. |
| 3-1/2 in. | 4 in. |
4 in. in. |
| Thread Type | Material | Kreg® Screws |
Fine |
"Hard" woods: Cherry, Maple, Oak, Walnut, etc. | Kreg® Coarse Thread Screws |
Coarse |
"Soft" woods: Pine, Fir, Poplar, Cedar, etc. Why the PocketMax works in both soft and Hard Woods |
Kreg® Fine Thread |
Super Eight |
Man Mades: MDF, OSB, Particle Board. | |
McFeely's NoCoRode PocketMax Stainless Steel |
Exterior Uses (Corrosion Resistant Coated and Stainless Steel) | Kreg® Blue Coat and Corrosion Resistant Coated Stainless Steel |

Pockethole Joinery: What you need to know!
Updated 11/19/2025
Pocket-hole joinery is popular because it is a fast, strong, easily adaptable, and precise assembly method. Joints are as strong as mortise-and-tenon joints and can be made in a fraction of the time. Kreg's® Award-winning Jigss use a 3/8 in. counterbore bit with an 11/64 in. pilot to drill a 15° angle into the first piece. With the joint tightly clamped, a special self-drilling pocket-hole screw is placed in the pocket and driven tight to complete the joint. It is a simple joint that almost anyone can do with simple steps.
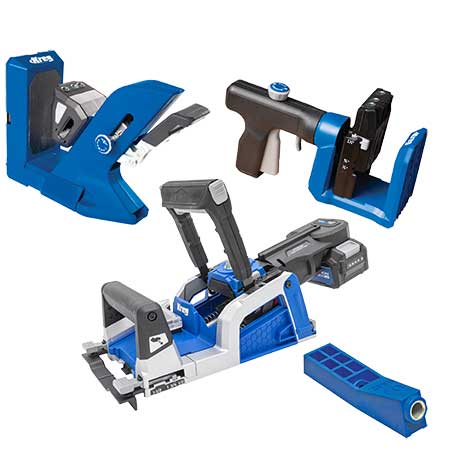
Kreg has several Pocket-Hole Jigs for all different levels of woodworker. From small clamp on jigs for doing a few joints, to the new Kreg Ionic Drive Rebel Pocket-Hole Joiner.
- Kreg 20V Ionic Drive Rebel Pocket-Hole Joiner Kit
- Kreg 720PRO Pockethole Jig
- Kreg 520PRO Pocket-Hole Jig
- Kreg Jigs
Pockethole Screws work well in traditional cabinetry using 3/4 in. to 1-1/4in. material and allow the user to create miter joints and piece joints quickly and easily without clamps.
Pocket-hole screws are different from other woodworking screws in that they feature an auger point (Type 17) to prevent raising a chip between the two parts during assembly, ensuring a tight joint. A Fillister or Washer Head with a #2 Square recess and extended unthreaded shank allows the screw to pull both sides tightly together. Pockethole screws, with their Optimized Thread Length design, cross the joint on the centerline for strength, and the threads do not cross the joint, eliminating the possibility of board jacking.
The Anatomy of a Pockethole and Why It Works
Things to be aware of when making Pockethole Joints
Make your cuts precise
If your joints are 90° or any other angle, ensure they are clean and accurate. It will show in your finished product if you do not have accurate cuts. Check the accuracy of any saws you will use to make your cuts and tune them up if necessary before you start your first cut.
Plan your work; work your plan.
Now that you have cut your pieces and laid out your pieces to check the joint fit, plan your work. Know where you will drill your holes and mark them on the pieces. When determining where to drill your holes, avoid drilling into the end grain because it's the weakest holding of the screws. Instead, drill into the side grain to give you maximum holding power. Marking your drilling on the back side of the face and using that to drill your holes will help to prevent accidentally drilling into the best face.
The Correct Pockethole Depth Is Critical
If your pockethole is too shallow, the threads will not fully exit the piece you are trying to join (Board Jacking), and the joint will not pull tight without overdriving your screw. If it's too deep, the material left to hold the joint together will not be sufficient for a long-lasting joint. For the strongest joints, set the stop collar according to your jig's instructions. The pilot point should stop 1/8 in. from the workpiece's end or edge. Check the Jig and Drill Bit Stop Collar Settings each time to avoid drilling to the correct depth for the current project.
Kreg's Material Thickness Gauge allows you to easily determine material thickness (1/2 in., 3/4 in., 1-1/2 in.), and has a built-in hex wrench for tightening the stop collar. The stop collar window aligns with etched markings on the drill bit for easy setup.
Higher Speed = Cleaner Holes
Corded drills generate a faster and consistant bit speed than cordless ones. If you are using a cordless drill, make sure to keep the battery charged up. At the first sign of slowing, change or charge the battery before continuing. A dull bit can leave you with excessive tear-out around the pocket. Keeping a second bit on hand so you can change it out when the first begins to dull can give you a better-finished product.
Lubricating the Bit Can Smooth the Way
Before drilling, spray the drill bit with a dry lubricant to reduce drilling friction and prolong sharpness. Repeat after every 20 or so holes.
Clear Chips Often
Drill about halfway and pull the bit out to clear the chips. Clearing the chips often reduces friction and a bit dulling. If possible, hook up a dust/chip collection to clean the work area.
Different Thicknesses Need to Be Matched Up
With joints that have boards of two different thicknesses edge–to–edge or end–to–end, you want to set your jig to drill the pocket–hole depth for the thinner of the two boards. If you are joining boards end–to–face or edge–to–face, such as in a table apron to the top, set the depth for the thickness of the board with the pockets, regardless of which is thinner, and then use a shorter screw if necessary.
Glue and Screw
Do a dry fit, ensuring you have all the clamps you need and everything is in place before applying any glue. If the final project is outdoors, use an outdoor glue. Check out our Titebond Glue Comparison Page.

Tech Tip: Plugging and Pocket-Hole
Pocket–hole plugs are cut at an angle so that they sit perfectly flush on the top of the screw head when fully inserted. A small amount of plug will remain above flush and must be trimmed off with a hand saw or sanded.
Steps to Plug a Pocket–Hole:
- Drill home to an adequate depth and drive the screw to secure the joint. Tip: Set your drill bit approximately 1/8 in. further from the step of the drill to ensure that the screw head will be deep enough for the plug to cover the Pocket-Hole fully.
- Glue and place. Place a fair amount of glue into the bottom of the pocket and around the perimeter of the plug. Press into place and wipe away any excess glue.
- Trim or sand off excess plug. Softwoods can often be made flush with an orbital sander, while hardwoods will most likely require trimming with a flush–cut handsaw before final sanding.
Tech Tip: "Miter" a Strong Corner with Pocket-Holes
One of the most common problems woodworkers face is constructing a durable. Tight, beveled joint. Using normal mitering techniques, if the joint is tight, the "wire" edge that results is vulnerable to splintering and chipping. The solution is to move the corner away from the joint! Pocket–hole joinery makes this easy, as shown.
Make sure your cuts are all square.
Before doing your cuts, use a square to ensure your table saw or chop saw will produce a square cut. You will have poor joints or gaps if your cuts are not square.
Plan your work and work your plan!
First, lay out your layout before drilling any holes. With everything laid out, you can decide the best face to drill your holes. Mark them and add any lies to line up your pieces. If they are in the rails, they will line up with styles. Once everything is laid out, drill your holes and start your assembly. Make sure that your holes are drilled in orientation so that the screws will be installed into the face grain, not into the end grain. Screwing into the end grain leads to weak joints.
Sizing up your pieces
If you are joining two pieces of different thicknesses, use the thinner of the two thicknesses for your Pocket-Holes. If you are using Pocket-Holes to attach a table apron to the top, use the thickness of the apron, no matter which one is thinner, and use shorter screws.
Choosing the right screw length for optimum hold
Use the chart above to select the right length of screws for your thickness and application. For exterior applications, you should use either Stainless Steel or the corrosion-coated Coated Screws. Stainless Steel is required when you are within 10 miles of the ocean or near a chlorine pool.
Don't Forget the Glue
While pockethole screws make a good, solid joint, adding glue will help create a stronger joint during any seasonal wood movement.
Use Clamps
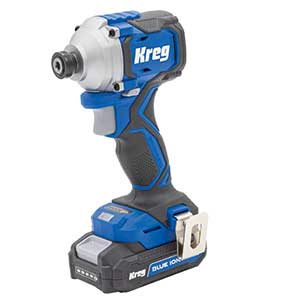
Clamping the joint helps pull it together and hold it in the correct placement while you drive your screws. A drill with a clutch instead of an Impact Driver is best. You can not see into the hole to see when the head is seated. An Impact Driver can drive the screw and break the shoulder of the pockethole. Now that we have said that, many Impact Drivers do have a speed control that make them easier to drive the screw, and stop before over driving the screw.
The Kreg 20V Ionic Drive™ Impact Driver impact driver features three speed settings and Assist Mode, this impact driver gives you ultimate control, ensuring smooth operation while preventing overdriving in softwoods and plywood. The variable speed trigger provides precise adjustments, while the quick connect hex chuck enables effortless bit changes. Reverse Assist Mode engages a controlled pulsing action before backing out screws, then removes them at half speed — preventing stripped heads and ensuring smooth removal.
The Jig and Drill Position
When you drill using a Kreg® Pockethole Jig, the very tip of the Pockethole gets positioned roughly at the center of the material’s thickness. Centering the pockethole will ensure plenty of wood around the hole for maximum strength.

The 15° Drilling Angle Creates an Oval
As you drill, the stepped drill bit enters the wood at a 15° angle. That is what creates the distinctive oval shape. The Pocket-Hole-Jig ensures this angle is consistent and the bit is steady as you work, making drilling an angled hole foolproof.

Double-Duty Drill Bit
If you look "inside" the material again, you can see what happens as you drill the Pockethole. The special stepped drill bit does two things: The smaller tip drills a pilot hole for the screw, while the main part of the bit drills the pocket that the screw fits into.
- Use a corded drill because speed gives you a cleaner bore. When using a cordless drill, the battery's power decreases as you use it.
- Setting the Stop Collar – This is very important. To get the proper joint and not have the screw go in too deep or not far enough, set the Stop Collar to the correct thickness of the wood. The Pilot (the smallest part of the bit) Point should be greater than 1/8 in. from the edge. That sets the hole to the correct depth for the strongest joint. Kreg's Material Thickness Gauge allows you to easily determine material thickness (1/2 in., 3/4 in., 1-1/2 in.), and has a built-in hex wrench for tightening the stop collar. The stop collar window aligns with etched markings on the drill bit for easy setup.
- Use a Dry Lubricant - You can use a dry lubricant to assist in keeping the bit shape by reducing friction and keeping your bit sharper longer. It is recommended that you do this about every 20 or so holes.
- Clear the chips that are produced often. Clearing the chips will reduce bit dulling and friction.
- Keep an extra drill bit on hand when (not if) the one you are using becomes dull.

Parts of the Pocket
A cutaway view of the Pockethole shows all the elements differently. At the base of the pocket, there’s a flat ledge that the Head of the screw will contact. The pilot hole continues almost—but not quite all the way—to the end of the board. It stops short for a good reason: To prevent the wood fibers from "blowing out" as the bit would exit the material. That way, there is nothing to interfere with this piece fitting tightly against the mating piece.

Self-Tapping Screws Keep It Simple
The Pockethole makes this joint possible, but it’s the Pocket-Hole Screw that pulls it all together. As you drive the screw in, the pocket and pilot hole guide the screw precisely while the screw’s self-tapping tip drills its hole into the mating piece. That means you do not have to drill into both pieces, and you will get great holding power without splitting or stripping the wood.
Choosing the Right Screws
Choosing the right screw, just like drilling the right size and depth hole, makes your joint strong. Coarse–threaded pocket screws provide a better hold in softer woods, such as pine, cedar, and poplar, as well as plywood, using fine–threaded screws for hardwoods. Our Super Eight Threaded PocketMax Screws work well in MDF, OSB, and Particle Board. Choose the length based on the workpiece thickness, as shown in the chart to the right.
Can I use Drywall Screws for Pocket–Hole Screws? No, never use drywall screws in place of pocket-hole screws. "Drywall" screws are designed to penetrate a layer of powdery drywall and soft, wooden, or thin metal studs. They have threads to the lower side of the Bugle Head (because it looks like the "Bell" of a Bugle), and will not pull the joint tight. In addition, they are hardened and have a thinner shank than pockethole screws that can and will easily break while driving in a non–drywall application. Their Bugle Head can split the bottom of the pocket shoulders, ruining your joint.
Thread Design
Our PocketMax® screws are modern production screws and have a Deep Thread design. The primary advantage of the Deep Thread design was its wide, deeply spaced thread design. A 15° angle in conjunction with a 30° trailing edge provided a thread surface engagement nearly perpendicular to the screw axis, resulting in increased holding power. The sharp thread angle that cut into the material greatly reduced cracking, splitting, and bursting. Its smaller body diameter or minor diameter reduced driving torque while causing the least material distortion. Screws have thread design features, cutters built right into the thread design. The Type 17 point thread design offers greater holding power by displacing less material.
Type 17 Point
The Type 17 point is not a thread style but can enhance the performance qualities of most thread styles used in the woodworking industry. A slot or notch is cut out at the point of the score, which acts like a driving tip. The slot carves away the material, thus allowing it to drill itself in a pre-drilled hole of wood. It can often eliminate the need for a pre-drilled hole to relieve splitting. Type 17 point is excellent for hardwoods, softwoods, particleboard, and MDF. Type 17 points are commonly available today in our Deep Thread style and are quickly becoming the fastener of choice for the woodworking professional. There are many advantages to the Type 17 point, but seeing the slot into the shank and threads is slow, and the additional expense must be compared to the benefits.
Click here for PocketMax Screw Test Results
Head Style
A Fillister (also called a Flat Top Pan or sometimes a Cheese Head) or Washer Head Screw with a #2 Robertson® Square Recess and extended unthreaded shank enables the screw to draw the two members of the joint tight. The Robertson® Recess was first introduced to the USA in 1957. Since then, woodworkers worldwide have known the benefits of Square Drive Screws. It has a more positive fit that reduces & " cam out; and requires only four foot-pounds of pressure to keep the bit engaged. Square recess drivers last longer than most other recess driver types, and only two driver sizes are required to fit the most common Square Drive Screw sizes.
Fillister Head: Is similar to a Pan head, making side height. The higher head profile provides a deep recess, making this head style easier to drive. These screws are known for their high strength, accuracy, quality, and durability. Mainly found in Pocket-Hole Screws. In Pockethole screws, the Head is usually undersized by one size to prevent the Head from scraping the walls of the Pockethole. Heads the same size as the pockethole could cause the screw to not go in straight and create a weak joint.
Washer Head: An oversize washer is formed as part of the Head itself, providing a larger bearing area, which is especially useful when fastening soft materials. The flat bearing surface under the Head prevents the screw from being countersunk.
Screw Finishes
Dry to the touch lubricant, or " Dry Lube" that offers a reduction in driving torque and a finish that does not interfere with dust collection systems or bleed during the staining process of the wood. More economical than plated parts, they are popular among professional woodworkers. They are a brownish color that allows them to blend well into wood.
Clear Zinc The silver appearance of Clear Zinc has been around for many years and remains very popular. It also provides a moderate level of rust protection. Since this is a true electroplating, the zinc coating is part of the surface of the steel and is very durable. Other chemicals can be added to the process, and the depth of the coating can be controlled.
NoCoRode™ corrosion resistance plating we offer in manufacturer-conducted salt-spray testing. It has exceeded 1,800 hours in manufacturer-conducted salt-spray testing, making it almost 20 times more corrosion-resistant than standard yellow zinc plating. It works well with wit redwood outdoor world cedar, using ACQ pressure-treated wood. Use caution with redwood, Western red cedar, or similarly acidic steel woods − these tend to stain, sometimes even with stainless steel! Unlike the plating on hot-dipped galvanized screws, NoCoRode Plus doesn’t chip, and you won’t find the recesses full of plating material that makes the fasteners useless. Best of all, the plating is tan, so it "blends" with many pressure-treated materials.
Blue-Kote™ Screws made by Kreg® feature three anti-corrosion layers, making them the perfect choice for a wide variety of indoor and outdoor projects. Blue-Kote™ Screws provide rust resistance up to 400% greater than zinc-plated screws and work with pressure-treated material.
Stainless Steel provides the ultimate corrosion resistance for most woodworking projects. Although all products corrode sooner or later, stainless steel provides excellent protection. Since the carbon content of stainless steel is quite low, oxidation (rusting) is also quite low. However, the steel cannot be adequately heat-treated because of the low carbon content. As a result, the screws are soft and break easily when used in wood applications where high levels of torque strength are required. They are softer than our hardened steel screws because stainless steel is not generally heat-treatable − the wire must be soft enough to be formed yet hard enough to provide the desired strength. Type 305 stainless steels are nickel-inherently nonmagnetic, and chromium austenitic grades of stainless steels are not hardened by heat treatment and are inherently nonmagnetic. They provide excellent corrosion resistance and are suitable for many corrosive environments. Fasteners made from Type stainless steel comply with the 2012 and 2015 IBC and IRC.

The PocketMax Difference
- 60% Less Driving Torque with No Driver Bit Slippage (Easier to drive and eliminates driver bit cam-out)
- 50% Longer Type–17 Cutting Flute Eliminates Splitting (Longer cutting point cuts better and splits less)
- 45% Reduction of Splitting, Cracking & Bursting (Less splitting = more efficient production and less waste)
- 30% Greater Holding Power & Pull–Out Values (Holds and pulls joints tighter together)
 |
 |
 |
| 1. Cut the first piece at a bevel angle equal to the desired miter angle. | 2. Join together, making sure the seam is aligned on the inside edge. | 3. Joint away the overhanging edge to "move" the corner position. |

WARNING: Drilling, sawing, sanding, or machining wood products can expose you to wood dust, a substance known to the State of California to cause cancer. Avoid inhaling wood dust or use a dust mask or other safeguards for personal protection. For more information go to www.P65Warnings.ca.gov/wood.


Login and Registration Form